
Dirty and discolored grout affects many facilities even when consistent cleaning procedures are in place. Stained grout leaves guests with a negative impression. When guests believe that your facility isn’t well maintained, they may be hesitant to return, resulting in lost business.
Commonly found in restrooms, kitchens, entryways, lobbies, and other high traffic areas, tile & grout is often chosen for its appearance and durability. Grout can be difficult to maintain, however. Grout is very porous, allowing substances like urine in restrooms, grease in kitchens, and soil in entryways to easily penetrate the surface of the grout.
In most facilities regular floor maintenance programs include daily mopping procedures. Daily mopping is not enough to prevent soils from embedding into your grout and causing discoloration. Your mopping procedure can even be contributing to the build-up on your grout by depositing soils in cracks and crevices.
Without periodic deep scrubbing, grout easily collects soils and becomes a breeding ground for bacteria leading to unsightly stains and foul odors.
Traditionally, removing grout stains is viewed as a time-consuming and costly procedure. Not to mention that even after the grout cleaning procedure is complete, you may not typically see noticeable results.
There is an easy and effective way to remove grout stains and restore the color of your grout, and this article will show you how. We will cover the best janitorial cleaning equipment, commercial cleaning supplies and steps to follow for best results.
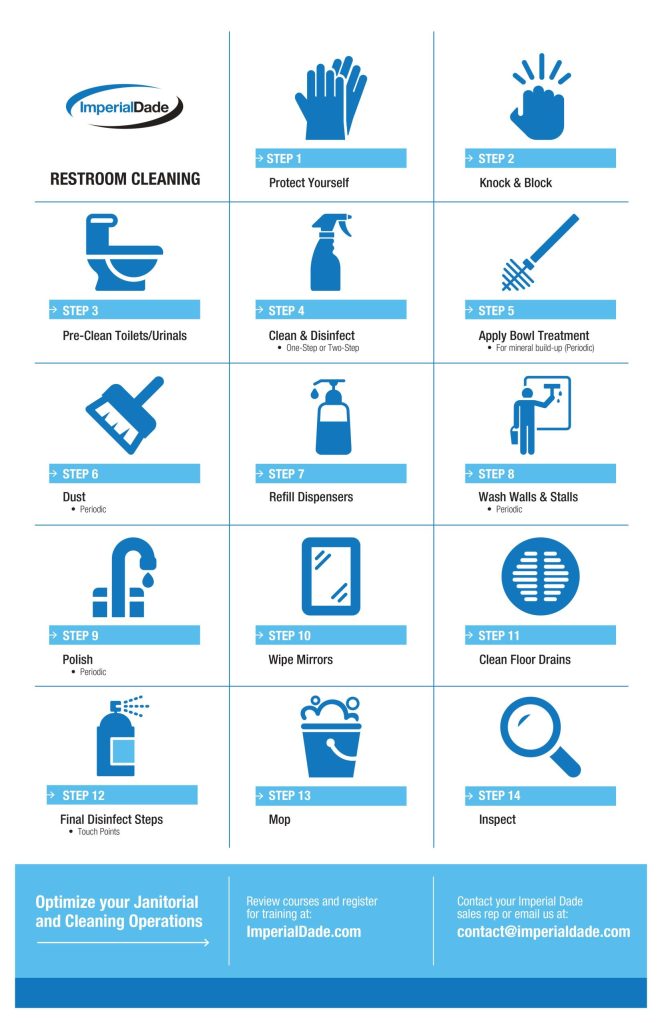
Don’t forget to snag our FREE restroom cleaning checklist. You can hang this poster anywhere!
Download our restroom cleaning checklist:
Preparing to Clean
It is important to begin any cleaning procedure with the proper tools, commercial cleaning supplies, janitorial cleaning equipment, and personal protective equipment (PPE).
Required Tools, Materials, & Equipment:
Materials
- Gloves
- Goggles
Supplies
- Grout Restorer or Grout Cleaner
- Baseboard Cleaner & Wax Stripper
Equipment
- Wet-Dry Vacuum
- Carpeted Sealed-Back Mat
- Wet Floor Sign
- Stiff Bristled Scrub Brush
- Mop and Bucket
- Floor Scrubber or Doodle Scrub
Always begin any cleaning procedure by putting on the necessary personal protective equipment.
Place wet floor signs outside of the area to signal to guests that there is cleaning in progress and could be hazardous if they enter the area.
Step 1: Remove Debris
Begin the cleaning process by removing all large debris from the area.
Place a carpeted, sealed-back mat at the outside of the area being cleaned. The mat will collect any excess liquid or soil from being tracked out of the area and throughout the rest of your facility.
Step 2: Apply Grout Restorer or Grout Cleaner
Apply enough grout restorer or grout cleaner to liberally cover the area.
If you are performing this as a restorative scrubbing procedure for the first time or if you are experiencing a large amount of dirt build-up or grout discoloration, use grout restorer with this scrubbing procedure.
Warning: Grout restorer is extremely acidic and should only be used once a year with this scrubbing procedure.
If you perform this scrubbing procedure with grout restorer too frequently, the chemical will begin to eat away at the grout, causing permanent damage.
If you are using this procedure as a part of your periodic maintenance routine or if you are experiencing lighter soil build-up, use grout cleaner with this scrubbing procedure.
Pro Tip: After you have completed this procedure once with grout restorer, we recommend adding this process to your periodic maintenance routine. Use grout cleaner to perform this procedure 4 times a year (quarterly) to help prevent heavy soil build-up and the need for more heavy-duty chemicals (like grout restorer).
You should always make sure you are following the manufacturer’s guidelines for proper product use, dwell time, and product removal. Read the entire product label before applying the solution.

Step 3: Spread Grout Restorer or Grout Cleaner
Use your stiff-bristled scrub brush to spread the solution across the floor.
Pro Tip: You are not scrubbing the floor in this step, you are only spreading the product.
Let the solution sit on the floor for the recommended wet dwell time. Use the product label to find the recommended dwell time.
Step 4: Scrub
Depending on the size of the area, choose the most efficient piece of janitorial cleaning equipment to scrub your floor.
We recommend the use of a Doodle Scrub floor scrubber paired with its Blue Tile & Grout Pad.
Pro Tip: The Doodle Scrub machine is great for tight areas such as behind urinals or under partition walls in restrooms, where larger floor scrubbers may not be able to reach.
For cleaning large areas, use a floor scrubber with a brush attachment to scrub the solution. A floor pad will not be effective in cleaning grout stains. The uneven surface of grout floors do not allow for regular floor pads to fully penetrate down to the grout and remove deeply embedded bacteria and soils.

Make multiple passes over the floor.
Maneuver the Doodle Scrub or floor scrubber in different cleaning paths to ensure the solution has been able to penetrate all areas of the affected surface.
Step 5: Remove Dirty Solution

With your wet/dry vacuum, pick up the dirty solution.
Remove as much of the dirty solution as possible.
Step 6: Apply Water to Floor
Apply a large amount of clean water to rinse the floor. Use enough water to ensure that all of the grout restorer or grout cleaner will be removed.
With a clean mop, remove any grout restorer or grout cleaner that may have gotten on the bottom of the wall as a result of the scrubbing procedure.
Leaving any chemical behind can cause damage to the grout.
Step 7: Remove Water
Use your wet/dry vacuum to remove the dirty water from the floor.
Remove as much as possible.
Optional: Repeat steps 6 & 7 to ensure that all chemical has been removed.
Step 8: Clean Wall Edges / Baseboards
Wall edges and baseboards will typically experience dirt and grime buildup from previous mopping procedures.
Even if the wall does not look like it is dirty, this step is important in ensuring that any leftover chemical residue from the floor cleaning procedure is removed.
Warning: Walls that are lined with paint or wood can be damaged by chemicals and abrasive scrubbing. When cleaning where the wall meets the floor, be careful what chemicals you apply to the wall.

For walls that are lined with tile:
- Apply Grout Restorer
Apply grout restorer to the bottom of the wall/baseboard.
- Spread Grout Restorer
Use your scrub brush to spread the restorer.
- Scrub
If you are using the Doodle Scrub, insert the pad driver into the skate attachment. The skate attachment allows the scrubber to be rotated onto its side for powerful scrubbing of baseboards. The skate has rubber wheels to allow for easy maneuverability and reduced scuff marks.
Use the Blue Tile & Grout Pad with your Doodle Scrub to agitate the restorer allowing it to penetrate the surface.
If you are not using the Doodle Scrub, use your scrub brush to agitate the restorer.
- Apply Water
Rinse the area.
Pro Tip: Remember that removing all of the grout restorer is critical. The most effective way to do this is to liberally apply clean water with your clean mop.
- Remove
Use your wet/dry vacuum to remove any water and solution.
For walls that are lined with vinyl or rubber baseboards:
- Apply Baseboard Cleaner & Wax Stripper
Apply Baseboard Cleaner & Wax Stripper to the bottom of the wall/baseboard.
- Spread Baseboard Cleaner & Wax Stripper
Use your scrub brush to spread the chemical
- Scrub
If you are using the Doodle Scrub, insert the pad driver into the skate attachment. The skate attachment allows the scrubber to be rotated onto its side for powerful scrubbing of baseboards. The skate has rubber wheels to allow for easy maneuverability and reduced scuff marks.
Use the SHO Wet Strip Pad and white driver pad with your Doodle Scrub to agitate the chemical.
If you are not using the Doodle Scrub, use your scrub brush to agitate the chemical.
- Apply Water
Rinse the area.
- Remove
Use your wet/dry vacuum to remove any water and solution.
Step 9: Let Dry
Allow the floor to air dry or use an air mover/floor blower to accelerate the drying process.
Do not open the floor to guests before the floor is dry. Guests who enter the area before it is dry can track chemical and/or water out of the affected area, which can create slip-and-fall situations with guests and can damage floors.
When the floor is dry, remove wet floor signs and open the area to guests.
Final Thoughts
Discolored grout and unpleasant odors can leave your guests with a negative impression of your facility. Don’t let dirty grout affect your business.
Dealing with discolored grout can be time-consuming and costly if you’re not utilizing the right commercial cleaning supplies and janitorial cleaning equipment.
The right products and tools for the job are key to efficiently cleaning your facility.
Imperial Dade has a wide range of products and equipment to clean discolored grout and remove unpleasant odors. If you’re located in the United States, Puerto Rico, or the Caribbean, contact an Imperial Dade Specialist for a review of your current floor cleaning procedures and recommendations of the best products and procedures to restore your facility’s grout.
Don’t forget to snag our FREE restroom cleaning checklist. You can hang this poster anywhere!
Download our restroom cleaning checklist: